To ensure long-term operation of the roofing, the organization of the drain cannot be ignored. This is especially important if the entrance to the house is on the side of the ramp. In such places, water discharge may form on the head of the person walking and ice formation under the feet in early spring or late autumn. Therefore, it is necessary to organize the removal of water from the roof. To do this, you can make and install a gutter with your own hands.
Content
Principle of operation
The drainage fixture will ensure the removal of melt and rainwater from the roofing. Its absence can lead to premature destruction of the walls and foundation. Water flows into a specially designated place along a drain.
Copper, galvanized steel and plastic are suitable for attaching the gutter. If the roof has a large perimeter, then the most successful option would be the use of steel. For small structures, you can use plastic. Plus this material in that it is not subject to corrosion and has a low cost. The modern construction market offers an alternative to steel - polymer coated metal. It received a fairly wide distribution, despite the high cost, but it should be noted that it is justified by its service life. Well, as elite materials can be called titanium and zinc. The choice in their favor will certainly not disappoint anyone, but the material side of the issue remains open.
The gutter structure consists of five elements:
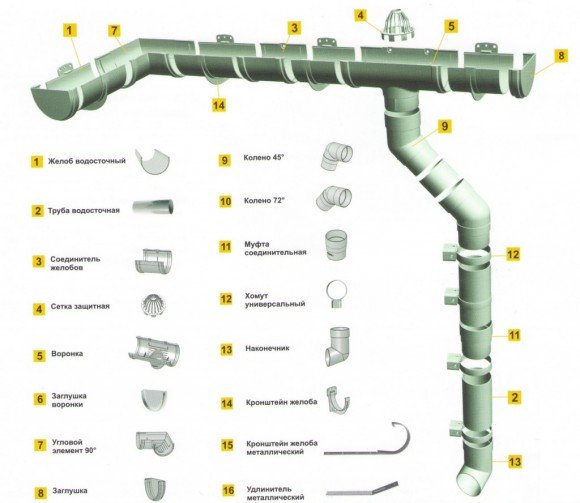
- Directly the gutter itself, in which water is collected, flowing down the slopes. To prevent overflow, special metal sides are used.
- A funnel is installed at the junction of the gutter with the pipe, designed to drain water from the gutter. By the way, there can be several of them on one funnel at once.
- Coupling used to connect parts.
- Brackets are used to attach devices to each other.
- The use of plugs helps prevent water from escaping.
The process of fixing the drain is carried out in 4 stages:
- Stage one - mounting the mount.
- Stage two - installation of funnels and plugs for the gutter.
- Stage three - connecting elements into a common system.
- Stage Four - Pipe Installation.
Production of a gutter
To begin with, we determine the shape of the future product. There are three of them - trapezoid, rectangular, semicircular.
Production takes place using the following tools:
- milling tool;
- the form that will be used for the manufacture of the gutter;
- a hammer;
- scissors for metal;
- marking tools, etc.
The following is a process for calculating dimensions. When the form is used, the rail is used to bend sheets. For a better flow of water, a semicircular trough is suitable. It can be made using a milling tool. If you bend the gutter in other ways, smooth semicircles may not work.
You can go by rolling out pre-cut pieces of galvanized steel in order to give them the shape of a semicircle. To do this, the sheet is cut and placed under a heavy object - for example, a rail, then, using special tools, it is bent to the desired shape.
After that we proceed to the manufacture of funnels. To figure out how to make it, let's analyze the element into its component parts. This is a cone, bezel and glass. The rim and cone should have the same diameter at the junction. In turn, this is the same condition - to ensure the same diameter, you must observe the place of fastening the glass with the pipe.Fulfillment of this requirement will avoid leaks in the system. Cut them out of sheet steel. They are rolled according to the principle of rolling pipes and gutters, described above.
To ensure a seam connection of the elements at the edges of each trough, the edge is bent outward. This will make the mount more reliable. In addition, a slight reduction in the groove on one side will allow for easy assembly of elements, giving strength to the seams. Thanks to this solution, even under heavy loads, precipitation will not leak.
Fastener Installation
The installation of the gutter system can only be started after the completion of the roof installation.
The gutter is installed using brackets. Anchorages must be selected in accordance with the material used for the drainage system.
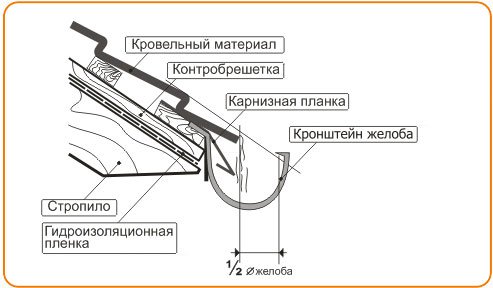
Brackets can be mounted in four ways:
- The first method involves attaching to the bottom of the flooring or crate.
- The second method provides for the possibility of installation while installing the roof. Fasten them to the frontal board of the roof. Such a method would be best for plastic gutters.
- The third method involves mounting in the absence of a windshield to metal pins, which must be hammered into the wall. Installation is carried out using studs.
- The fourth method is fastening to the rafters.

The choice of mounting method depends on the situation and installation conditions.. On the gutters, fastening is carried out with metal clamps.
When choosing a clamp system, a number of features are taken into account. The thickness of the insulation, which is located on the back wall, should be more than 5 cm. And the hardware should be mounted at a depth of 5-6 cm. A gap must also be left between the pipe and the wall. In no case should you mount the pipe to the wall. When using pipes, the material for which is PVC, it should be remembered that the clamp can not be placed close to the drain. With temperature differences, this can lead to the formation of cracks and cause a change in the size of the structure.
Independent insulation of the clamp can lead to the fact that the design will lose reliability. This will happen if you close the hardware.
Gutter mount
This process is carried out using a measuring tape, pencil, brackets, funnels for draining water, hooks, rope, self-tapping screws and nails..
First you need to measure the perimeter of the roof along the ledges. This will help determine the required length for the gutter. Brackets are installed in increments of 50-60 cm.
Next, select a place for the funnel. It should be one centimeter below the drip.
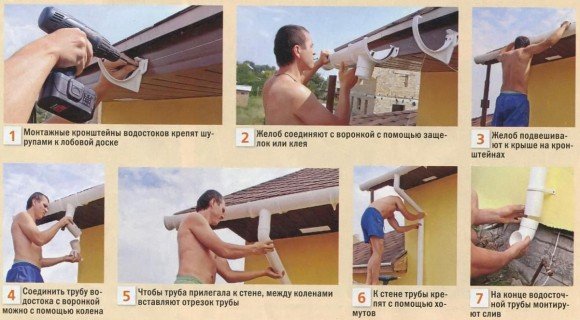
The installation of the gutter is carried out using brackets. When attaching hooks, pay attention to the angle of inclination. To facilitate the work, the hook should be strengthened. The rope is pulled between all of these elements to install the rest of the brackets on it.
After this, the gutter and funnel are laid on the installed brackets. Then they should be strengthened.
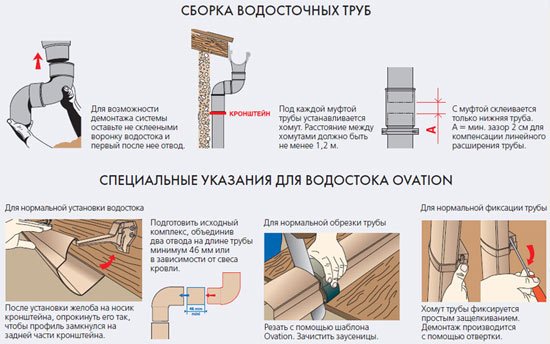
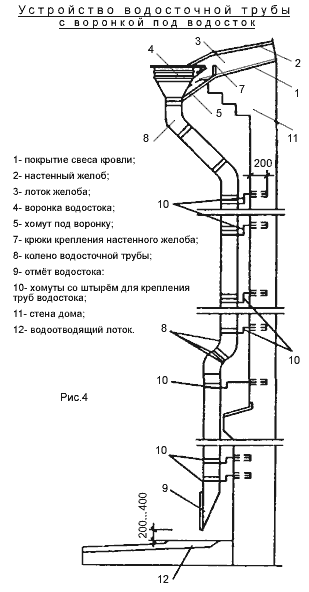
When attaching the vertical elements of the drain, work is carried out from the bottom up. To fix the pins in the wall of the house, holes are drilled. The mark is attached to the lower clamps. It is an element of a pipe having a cut angle.
The following is the installation process for the remaining links. For fastening of individual elements use collars. For parts of the system having a length of more than two meters, additional clamps are mounted. The correct step for installation is a value of not more than 180 centimeters.
Installation of a drainage system is quite a responsible matter. It is important to properly and securely fasten the structure. We must not allow the possibility that the pipe will fall off.



SVETA
Thank you, but how to fix a square drain if it is without fasteners?