When the house is almost ready it remains only to put a roof, but there is a difficulty, because many types of structures require a separate project. A pitched roof with your own hands is built simply, but only if the person dealing with this issue knows what needs to be done. To do this, we will consider below the features of such a design and materials suitable for it, which will ensure heat preservation and weather protection.
Content
Shed Roof Technology
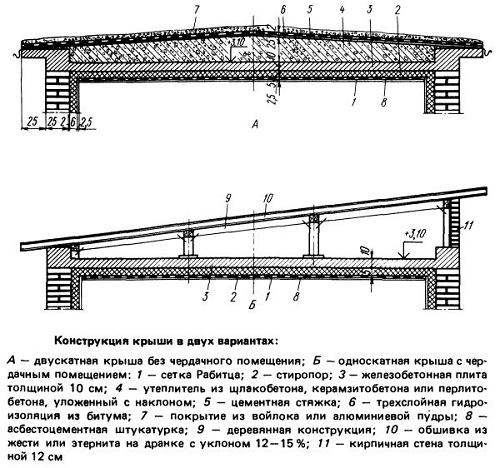
A pitched roof attracts many because it requires a minimum number of building materials, and can also be built even with minimal construction skills. This is the simplest type of roof, which is suitable for both a residential building and for outbuildings.
Of course, the complex design of the roof allows you to get a very attractive appearance of the building, but in this case it will take more building material, more time and most importantly, more money for the whole project.
The ideal situation is when a do-it-yourself roof is created according to the project that the specialist developed. In this case, it will only be necessary to comply with all the requirements listed there, however, even then some difficulties may arise, some of which will be described in this article.
The single-pitched construction, like many other types of roofs, is made using wood as the main building material. It is from it that the rafters, beams and elements of the lathing and counter-lattice are obtained. Slate, metal, Ondulin, and other materials can be taken as roofing.
Slope calculation
Before you make a pent roof, you need to choose the right angle. It is also determined by the material that will protect the roofing cake from rain, snow and wind. It is obvious that the tiles and slate retain snow and water differently than the metal profile, which will also need to be taken into account in the process of creating a roof. It should be remembered that the ability of the material to quickly clear of precipitation in this case is one of the key, since it determines the safety of the entire structure.
It is not worth neglecting the analysis of the rate of precipitation removal, since a large amount of snow collected after heavy snowfall will easily break the roof or severely damage it.

Ruberoid or other rolled material allows the use of the smallest angle of inclination of the roof, which can be as little as 5-10 degrees. A roof covered with slate will require a 20-degree slope, and for a tile, at least 25-35 degrees are needed.
The smoothness of the surface is directly related to the minimum angle that roll materials clearly demonstrated. In addition to the type of coating, the properties of the terrain should be taken into account, for example, if the roof of the building can be blown from all sides by the wind, the slope of the slopes can be made smaller. In the case when the building is surrounded by tall trees, steeper slopes should be made, since the snow will not be blown away by the wind.
Materials and equipment
When a pitched roof is being built with your own hands, you need to prepare the appropriate tools and materials. First of all, you need:
- Wooden bars. These are the elements that will act as supporting structures. Their sizes can be from 12x12 cm to 15x15 cm.
- Boards.They will be required to complete the floor and rough walls in the attic, and must be laid on top of a horizontal beam.
- Slate nails and slate. In the event that a different type of coating is used, for example, Ondulin, then the fasteners intended for this material must be used.
- Thermal insulation materials.
- Waterproofing membrane.
- Vapor barrier.
- Nails for mounting timber and boards.
The tools will fit the same ones that are used for minor repairs and are in almost any home. This list includes a hammer, an ax, a hacksaw, a sharp knife, a construction stapler. The latter is useful when installing hydro and vapor barrier, as it is excellent for fixing films to rafters.
The roof construction of a single-slope type provides for the use of lathing and counter-lattice, for the creation of which it is best to use a 5x5 cm beam. You can clarify the need for certain materials in the project documentation, after the preparation of which you need to start work.
Stacking
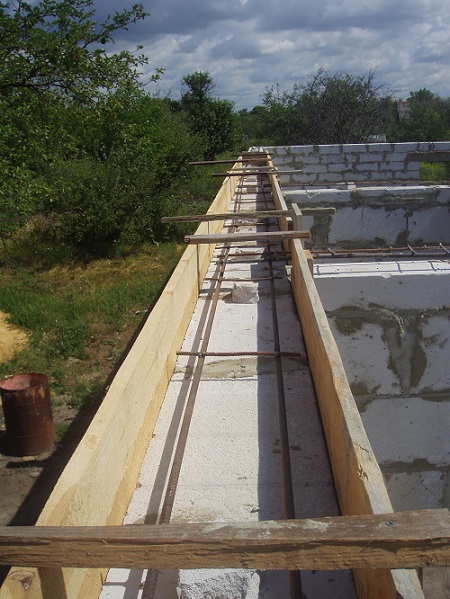
Installation of beams is carried out in increments of 70..80 cm on top of the wall. As a basis for them, a seismic belt or Mauerlat should be used.
The first of them is a monolithic reinforced concrete structure, which is created along the upper perimeter of the walls. She repeats their contour and must be closed. It is used to increase the structural resistance to constant deforming loads caused by wind.
To create a seismic belt, a formwork is mounted, the height of which should slightly exceed the height of the future structure. The next stage is the installation of reinforcement. When the roof is installed with your own hands, it can already be done a few centimeters than the wall itself, and fill the resulting gap with polystyrene foam.
Mauerlat is a beam that is laid around the perimeter of the outer wall and acts as the lower reference point for the rafters. The purpose of this element is to distribute the load, which is transmitted by the support points over the entire area of the upper edge of the wall.

The lower part of the pitched roof should be located on the leeward side.
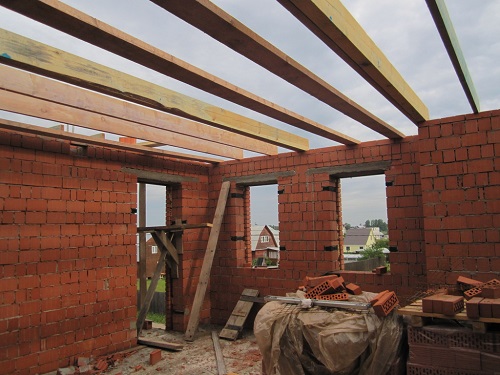
After the installation of the beams is completed, rafters are mounted on top of them, which will serve as a support for the top point of the roof. The number of rafters must exactly match the number of floor beams. After this stage is completed, a semblance of a right triangle is obtained, the sides of which are formed by a beam and a vertical rafter. The final stage of the installation of rafters is the installation of inclined beams, which are fixed with anchors to the concrete base or are attached to the Mauerlat using nails-weaving.
For the convenience of performing work on the rafters themselves, boards can be laid on which workers move during the erection of the roof, but then they are removed when it comes time to lay the slate.
Warming
The arrangement of the roofing cake depends on the type of finish. In general, we are talking about insulation, which must be protected with hydro- and vapor barrier. The first is needed to protect the power structure from moisture and ensure its long service life. The second task of waterproofing is to protect the insulation from moisture from the outside.
In the event that some points are unclear, you can see how to create a pitched roof with your own hands - there is a video on our website. It shows in stages all types of work, and also there is information about the materials that are best used to create a roof.
Initially, clay and slag cement were chosen as a heater, but they had a number of drawbacks. These materials poorly resisted the effects of water and could not hold the required amount of heat, giving it to the atmosphere. Today, complex materials are used, for example, URSA.The special warming mat includes:
- plates of heat-insulating material;
- flat fiberglass blocks;
- basalt warming mats.
The main advantages of such materials include their relatively low cost, efficiency and ease of operation.
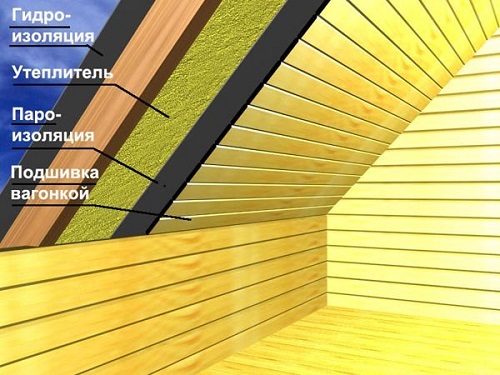
Before installing the insulation, you need to create a waterproofing. It is performed using a special material laid over the rafters. This is done if the thickness of the insulation is less than the height of the rafter legs. In the case when the heat-insulating material is equal in thickness to the height of the rafter legs, the film is laid on the upper planes of the bars intended to increase the height of the rafters. The waterproofing material is mounted across the slopes, and its overlap should be 100 mm. Between the waterproofing material and the roof you need to leave at least 50 mm of clearance, for which suitable pre-prepared 50x50 bars are suitable.
After the mats of the insulating material are unpacked, you must wait until it restores its size. This will take no more than 15-20 minutes, and you can speed up the process by shaking the insulation.

If you know in advance what width of insulation will be used, then this should be taken into account when developing the project, since 1.2 m mats can be laid in 2 layers with a distance between rafters of 0.6 m, and in other cases they will have to be cut.
After the insulation has taken its original shape, it is cut and placed between the rafters in accordance with the project, according to which the construction of a single-pitched roof with their own hands. In this case, it should be borne in mind that the material is installed in a spreader, and its width should be greater than the distance between adjacent rafters by 30 mm. If the mats were not cut along the length of the ramp, then in order to ensure reliable insulation of horizontal sections, they should overlap by 20-30 cm. A certain gap should be observed between the insulation and waterproofing film, for which conductors from bars can be used.
The final stage of the installation of the heat-insulating material is a vapor barrier device, which is placed in the lower plane of the rafter legs and fixed with galvanized nails having a flat head, or with staples of a building stapler. The vapor barrier film is placed with an overlap of 10 cm, and to ensure the tightness of the canvas are connected with special adhesive tapes.
Crate Creation
The lathing is designed to hold the topcoat and it relies on the elements of the counter-lattice nailed to the rafters. Typically, 50x50 mm bars are used for these purposes, and the distance between them depends on the material chosen and the technology used.

Slate crate should not be made of knotted boards, as it may not withstand snow loads. Raw lumber is also better not to use, because as the boards dry, the fastener will weaken and begin to loosen, which will weaken and then destroy the entire roof.
The simplest option is slate, so we will consider it. For the installation of corrugated sheets, a transverse lathing will be required, made in such a way that there are 4 bars under the slate sheet. Those. the first of them is locally the lower overlap, then 2 crate elements holding the central part of the slate, and the 4th block, which is needed as a support for the upper part of the sheet. When using sheets with a length of 175 cm, the distance between the horizontal bars of the lathing will be 175/4 = 44 (cm).
In the event that it is supposed to use another material, then the crate will need its own. For example, for direct slate, a continuous crate is required. Under a soft tile or roll roof, use a crate of plywood sheets, etc.

The technology of creating a lathing depends on the material chosen for covering the roof, therefore it is worth observing it strictly, otherwise expensive repair of the roof is possible, with the replacement of all elements of the roofing cake.
Topcoat Installation
Since this article discusses how to create a pitched roof at home with your own hands, it does not make much sense to delve into the issues of installing slate. Below we will consider only general points, which can be clarified in the material on working with slate. It is posted on our website as a separate article.
Installation of sheets is best to start from the leeward side. The upper layers are overlapped on the bottom. The most common is the following mounting option:
- the first sheet is placed next to the gable overhang;
- then two more are mounted in the front row;
- after that, two sheets are stacked in the second row, and in the first one, etc.
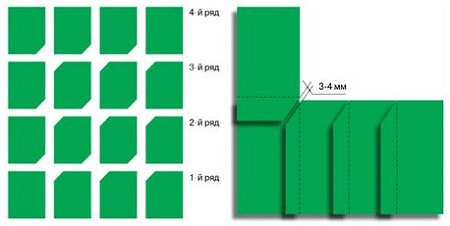
In the process, it is necessary to ensure that the vertical overlap is within 12..20 cm, and the horizontal overlap is one wave. In this case, the sheets are stacked so that the sides of the elements of the upper layer coincide with the sides of the lower elements. It is also worth noting that the corners of the sheets are cut so that there is no skew in places where 4 sheets intersect.
In addition to the ridge and cornice sheets, all the others are cut so that the size of the cut-off area is equal to the overlap size increased by 0.5 mm, this allows you to join adjacent sheets with a gap of 2-3 mm.

Slate corners cannot be broken off. This will lead to a decrease in strength and cracking. Even if it is impossible to notice them visually, sooner or later they will appear, which will lead to accelerated wear of the roof, which means that it will require expensive repairs.
Cut the slate with a hacksaw or using a circular saw, and the resulting slices are painted over.
Prevention of damage to a shed roof
One of the main problems of such structures is too much rainfall in winter. It is the mass of snow that negatively affects the state of the roof, so you need to take measures to solve this problem. One of the most dangerous is thawing snowfalls, which can cause difficulties due to the fact that the snow sticks to the roof.

To avoid difficulties due to the excessive amount of snow, it is necessary to think over how the roof will be operated at the stage of developing the appearance of the roof, and also to evaluate the location of the roof exits and windows from this point of view.
Inspection of the roof also needs to be carried out annually, and special attention should be paid to the condition of the roof and roof structures. Sometimes there may be a weakening of wood due to rot damage, and there may be problems due to rodents.
As part of the annual inspection, it will not hurt to remove various debris that has accumulated between the waves of slate, since it is it that has a negative effect on the state of the roof covering. During rain, a large amount of water accumulates here, which gradually destroys the slate, and the snow will accumulate faster.
Summing up the brief results, we can say that in this article a fairly detailed answer was given to the question "how to make a pitched roof?". We examined most of the important points and even gave an example of a suitable way of laying the finish coating. Of course, slate is not the only suitable option, but you can also learn about other types of coatings on our website by reading an article devoted to each type of material.



Alas, no comments yet. Be the first!