Do it yourself tent to make your home or cottage interesting, unusual and always recognizable. It will always be favorably different from fairly simple gable or single-pitch roofs.
But the erection of such a roof on its own, without a doubt, will require time, effort and experience. No wonder the hipped roof is considered one of the most complex structures.
The success of the entire enterprise will depend on correctly performed roof calculations. Without performing the correct calculations, you can not even proceed to the next steps, since errors can entail a skew of the roof or, even worse, even its complete destruction.
Content
Features of a tent-type roof

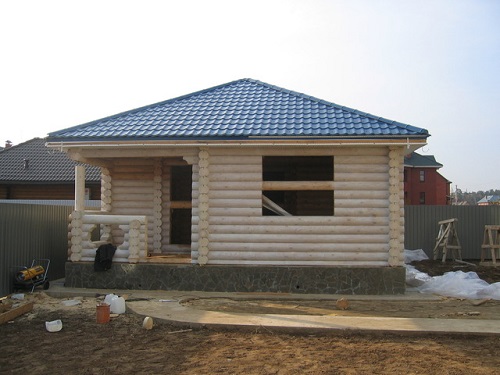
What is the difference between a tent roof and other types of roof? Its peculiarity is manifested in the fact that its structure is based on a square. In other words, it consists of four slopes and all four of these slopes are in the form of equilateral triangles, the vertices of which should converge to a single center.
In this case, it is not so important how many slopes will be on this roof. There may be more, or it may even have a round shape. The main thing is that during the construction of this type of roof the principles of symmetry are strictly observed. In appearance, this roof very much resembles a tent, as, for example, in a yurt, therefore it also has a name - tent.
The main difficulty is the correct calculation of the entire rafter structure. The best option would be if all the calculations are done by a construction company that already has a lot of experience in building this type of roof. But, however, if you make all the calculations yourself, then you can save a significant amount of money. True, it is better if there is at least some experience in this matter.
Basic rules for creating tent roofs
To calculate the tent roof, at first glance, is not difficult. All you need to know is the dimensions of the base (its length and width), and also remember to take into account the angle that the slopes form.
If the shape of the house is square, then the calculation should not be very difficult. In this case, the rafter system will consist of isosceles triangles, and the base will have the shape of a square.
To determine the length of the rafters and find out the future area and height of the entire rafter system, you need to calculate the area of one isosceles triangle, and then perform the action of multiplying by four.
If there is a rectangle at the base of the roof, then it will be easy to calculate using elementary formulas. Such a tent roof will consist of four parts: two identical triangles and two equal trapezoids. First, determine the length of the hip rafters, i.e. height (h) triangles and trapezoid.
Then we calculate the area of each of the figures according to the formulas, summarize the results and double it, obtaining the total roof area.
Example of calculating the total roof area
The area of the triangle: S = a * h / 2, where a is the length of the base; h is the height of the triangle.
Trapezoid area: S = (a + b) * h / 2, where a and b are the lengths of the bases; h is the height of the trapezoid.
After the calculations of the roof area, you can begin to calculate the parameters of other structural elements.
If you doubt your mathematical and design abilities, then, of course, the best way out in this situation is to order a drawing in a good construction company, from knowledgeable specialists.Having a drawing on hand, you can determine the amount of necessary building materials, and then proceed with planning the main stages of work.
System installation is a delicate matter
A traditional hipped roof should consist of the following parts:
- Mauerlat (a necessary part of the system, the so-called support block);
- Braces and struts;
- Special diagonal elements for better bonding of the entire structure;
- Side runs, as well as skating.

The design of the tent roof can be created using various technologies, it is possible to use both a hanging rafter system and a layered one.
When used in the construction of hanging rafters, the load will go to the external walls. In this case, the bursting force will go mainly in the horizontal direction.
The use of layered rafters allows you to evenly distribute the load not only on the walls, but also create internal supports, thereby relieving the excess load from the walls.
But you need to remember that the use of roof trusses on tent roofs is possible only if the angle of inclination of the slope does not exceed 40 degrees.

Since the repair of hanging rafters or their complete replacement by many specialists is considered to be very laborious, in this case it is better to invite experienced specialists who know how to make a tent roof.
So where do you need to start the construction of such a form of roof as a tent roof?
First of all, you need to start from the base of the building. If the building is wooden, then from the upper harness, which should already be prepared in advance for this. If we are talking about a building made of brick, then with a Mauerlat (supporting beam).
In brick houses, first of all, before laying the Mauerlat, you need to align the walls well. In this case, it is necessary to fill in the screed, and you must immediately mount special embedded elements in the walls for future installation of the Mauerlat.
The next step will be laying on the prepared flat surface of the support bars and bedding. But Mauerlat cannot be laid simply on bare brick. To do this, do not forget to lay a layer of moisture-resistant material. Mauerlat needs to be laid around the entire perimeter of the house, since during the construction of the rafter system it will serve as the basis for it.
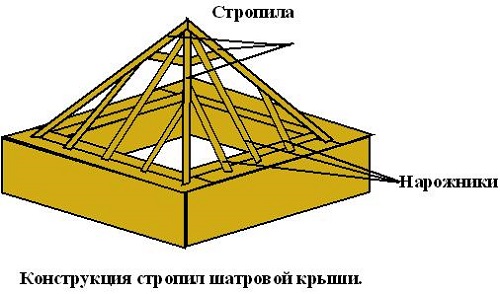
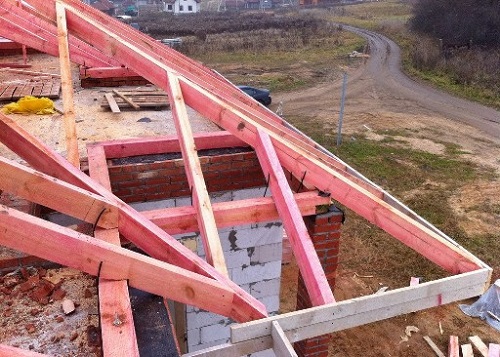
The design of the tent roof involves two types of roof trusses. One of them is truss trusses, which are connected in the ridge part of the roof. And others are lateral rafters in the form of a triangle. In addition, diagonal rafters can also be installed.
It is very important to observe the accuracy of the work. The hinged roof rafter system must be installed accurately and evenly. Especially it is necessary to take into account their length and angle of inclination, which should be absolutely equal on all four sides (because the triangles are isosceles).

If the installation of bone rafters went without problems, then you can proceed with the installation of the main, central ones. These rafters should have the same length and size, and should be located in relation to each other, must be strictly parallel. They are fixed as follows: one edge is attached to the Mauerlat, while the second is fixed on the ridge.
If you need to make installation in the place where different types of rafters converge, then you need to make a double cut. In this case, the planes of the same rafters should coincide in the place where there are bevels without fail.
Now it's time to move on to fixing the rafters going diagonally to the corner. To make the tent roof more reliable, they use a shard beam. Attach it to the rafters on both sides. The most important thing at this stage of installation is that the fastening takes place in a “run-up”, that is, in different places of the rafters that go diagonally. Installation is parallel to the elements located in the center.
So that the tent roof is the most durable, an additional transverse beam is installed.It is needed in order to better connect all the central rafters.
You can attach it to the ceiling when using several racks.

Before starting any types of work, it is imperative to conduct the processing of all wooden components with special flame retardants, and then the tent roof will be reliably protected.
After all the basic installation work has already been completed, you can proceed to other parts of the improvement of the roof, i.e. create reliable insulation, as well as lay steam and waterproofing materials, and, of course, the roofing material itself.
Install waterproofing from bottom to top. At the same time, when laying, make sure that there is a small overlap (at least 10 centimeters). The edge, which is below, needs to be put on the ledge of the eaves, but above, in the ridge part of the roof, it is not necessary to connect, this will give good ventilation for the insulation layer.
On top of the film you need to fill the counter-grill. It, in turn, should fulfill two functions: to carry out ventilation of the roof and to reliably hold the waterproofing layer. To achieve this goal, you need to nail additional bars to the rafter legs.
After the crate is installed, you can lay and strengthen the roofing material. In the interior, under the roof, it is necessary to lay a layer of insulation, and at the same time do not forget about the vapor barrier layer. If necessary, then all this can then be covered with a clapboard to create a more pleasant and aesthetic look.
If you follow the tips and instructions, then your tent roof will stand for many decades, delighting others and friends with its unusual shape. But nevertheless, if financial means allow, then it is better to invite experienced specialists to erect a tent roof.


Alas, no comments yet. Be the first!